Are you a beginner looking to create a website? If so, you’re in the right place! WordPress is a powerful and user-friendly platform that allows you to build your own website without any coding knowledge. Whether you want to start a blog, launch an online store, or create a professional portfolio, WordPress has got you covered.
In this guide, we will walk you through the process of getting started with WordPress, from installation to choosing the perfect theme for your site. We understand that the thought of creating a website might seem overwhelming at first, but don’t worry – with our easy step-by-step instructions, you’ll be up and running with your very own site in no time.
First, let’s start with the basics, WordPress installation. Don’t worry, you don’t need to be a tech genius to install it. In fact, it’s a fairly straightforward process that can be done in just a few minutes. We’ll show you how to set up your hosting, install WordPress on your domain, and get everything ready for your website.
Once you have WordPress installed, it’s time to start customizing your site. This is where choosing the right theme comes into play. WordPress offers thousands of pre-designed themes that you can install and customize to match your brand or personal style. We’ll guide you through the process of selecting a theme, installing it, and making customizations to create a website that truly reflects your vision.
So, whether you’re a blogger, an entrepreneur, or simply someone who wants to have their own corner of the internet, this WordPress guide for beginners will equip you with the knowledge and tools you need to bring your website to life. Let’s dive in and get started on your WordPress journey!
Step 1 : Getting Domain name and Hosting
So you’ve decided to create your own website and heard that WordPress is the way to go. Congratulations! WordPress is a powerful and user-friendly content management system that allows you to create and manage your website with ease. But before you jump right into it, there are a few key steps to setting up your first WordPress site that you should know about.
First and foremost, you need to choose a WordPress hosting and domain name provider. This is where your website will live on the internet. Look for a reliable hosting provider that offers a good balance of affordability and performance. Take into consideration factors like server uptime, customer support, and website speed. A popular option for WordPress hosting is Hostinger, which offers one-click WordPress installation and excellent customer support.
To read our article on obtaining a hosting and domain name with Hostinger Click here.
Step 2 : Choosing the Right Theme for Your WordPress Website
Once you have your hosting and domain name sorted, it’s time to familiarize yourself with the WordPress dashboard. This is where you will manage all aspects of your website. Spend some time exploring the various options and features available. One important aspect to pay attention to is the menu in the dashboard
. This is how you organize and structure the navigation of your website. Customizing the menu is crucial for making it easy for visitors to navigate your site and find what they’re looking for.
To make your website visually appealing and engaging, consider using a page builder plugin. These plugins provide a simple drag-and-drop interface that allows you to create custom layouts and add elements to your web pages. Popular page builder plugins for WordPress include Elementor, Divi, and Beaver Builder. These plugins offer a range of pre-designed templates and elements, making it easy for beginners to create professional-looking web pages without any coding knowledge.
Setting up your first WordPress site may seem daunting at first, but with the right steps and tools, it can be an exciting and rewarding experience. Just remember to choose a reliable hosting provider, familiarize yourself with the WordPress dashboard and menu, and consider using a page builder plugin to create visually stunning web pages.
Step 2 : Choosing the Right Theme for Your Website
When it comes to creating a WordPress website, choosing the right theme is crucial. Your website’s design not only plays a significant role in attracting visitors but also helps to convey your brand’s identity. With thousands of options available, it can be overwhelming to choose the perfect theme. However, by considering a few key factors, you can select a theme that will make your website stand out.
Firstly, it’s essential to understand the purpose and goals of your website. Are you running a blog, an e-commerce store, or a portfolio? Each of these requires different functionalities and design elements. For instance, a blog may prioritize readability and easy navigation for users to access your posts effectively. On the other hand, an e-commerce website needs to focus on showcasing products and providing a user-friendly shopping experience.
Secondly, it’s crucial to choose a theme that aligns with your brand’s aesthetics and message. Your theme should complement your logo, color scheme, and overall brand identity. This will help create a consistent and memorable online presence. Furthermore, the theme should be responsive and optimized for mobile devices, as an increasing number of users browse websites on their smartphones and tablets.
Lastly, it’s important to consider the flexibility and customization options that the theme offers. Ideally, you want a theme that allows you to make changes to the layout, fonts, and colors without needing to have extensive coding knowledge. Additionally, consider the compatibility of the theme with popular WordPress plugins to enhance the functionality of your website.
There are thousands of free and paid WordPress themes that you can install on your site.You can modify the WordPress theme for your website from the admin dashboard. Visit the Appearance » Themes page and click the ‘Add New’ button.
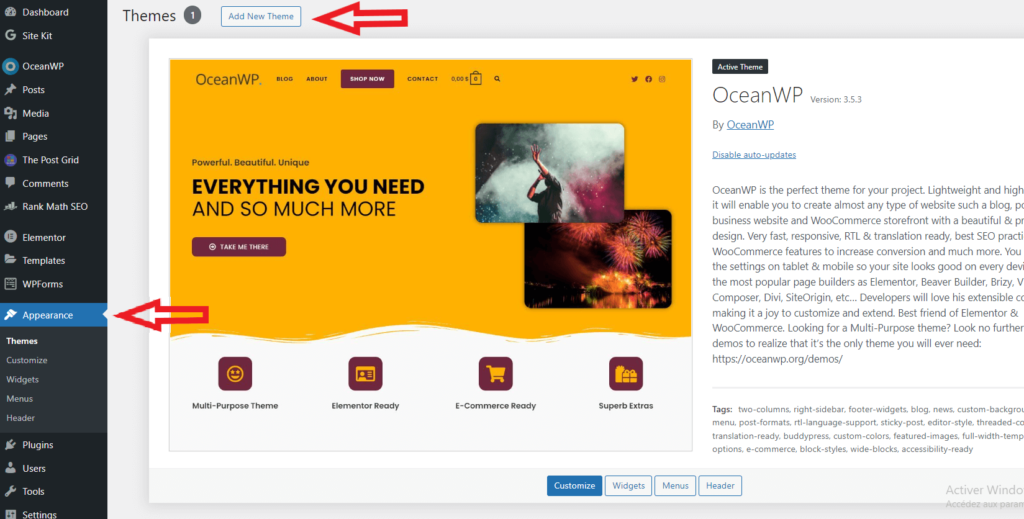
You can search from 6,000+ free WordPress themes available in the official WordPress.org themes directory.
You can sort them by popular, latest, featured, and other feature filters (i.e. industry, layout, etc).
If you have a free theme, in mind that you want to install you can search for it by typing its name in the search field.
WordPress will display the theme in the search results. You’ll need to move your mouse cursor over the theme and click on the Install button.
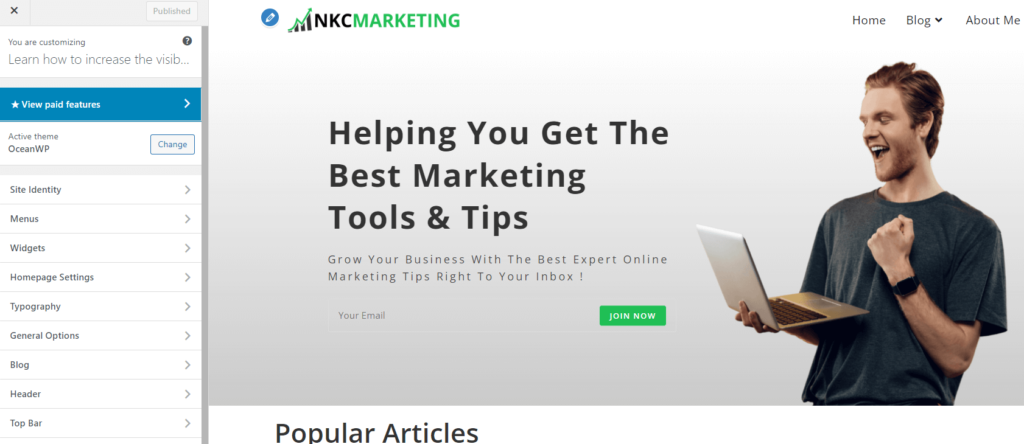
After you’ve successfully installed your theme you can personalize it by clicking on the Customize option, in the Appearance menu.
This will open up the theme customizer allowing you to modify your theme settings while previewing changes, on your website.
In this guide we will use a used WordPress theme called OceanWP. It is a theme that offers various design options suitable, for different types of websites.
In conclusion, choosing the right theme for your WordPress website is essential for creating a visually appealing and functional online presence. By considering factors such as the purpose of your website, aligning with your brand’s aesthetics, and customization options, you can ensure that your website stands out and effectively communicates your message to visitors. Your WordPress theme is like the domain name of your website – it sets the tone and creates a memorable experience for your audience.
Step 3 : Customizing Your WordPress Site: A Step-by-Step Guide for Beginners
WordPress is a popular platform for creating websites and blogs due to its user-friendly interface and extensive customization options. Whether you’re setting up a personal blog or establishing an online presence for your business, it’s important to make your WordPress site reflect your unique style and branding. In this step-by-step guide, we’ll take you through the process of customizing your WordPress site to make it stand out from the crowd.
The first step in customizing your WordPress site is to navigate to the “Appearance” section in your WordPress dashboard. Here, you can choose from a variety of themes to give your site a different look and feel. Once you’ve selected a theme, you can further customize it using the built-in Theme Customizer. This powerful tool allows you to change the site identity, colors, header image, and more.
Next, you’ll want to create and customize your WordPress pages and posts. Pages are used for static content such as your “About” or “Contact” page, while posts are for dynamic content like blog entries. To create a new page or post, simply navigate to the “Pages” or “Posts” section in your WordPress dashboard and click on “Add New”. You can then add your content and use the formatting options to make it visually appealing.
To further enhance your WordPress site, take advantage of the countless plugins available. These plugins can add functionality, improve speed, enhance security, and much more. Popular plugins include Yoast SEO for search engine optimization, Contact Form 7 for creating contact forms, and Jetpack for site statistics and performance monitoring.
Customizing your WordPress site doesn’t have to be complicated. By following this step-by-step guide, even beginners can create a unique and professional-looking website or blog. Experiment with different themes, use the theme customizer to achieve the desired look, and make use of plugins to add extra functionality. With WordPress, the possibilities are endless, and your site can truly reflect your own personal style.
Step 4 : Adding Content to Your WordPress Website: Beginner’s Tips and Tricks
Creating and managing a website can be a daunting task, especially for beginners. WordPress, a popular content management system, offers an easy and user-friendly platform to build and customize your website. One of the key aspects of a successful website is adding quality content to engage and attract your audience. In this article, we will explore some tips and tricks for adding content to your WordPress website.
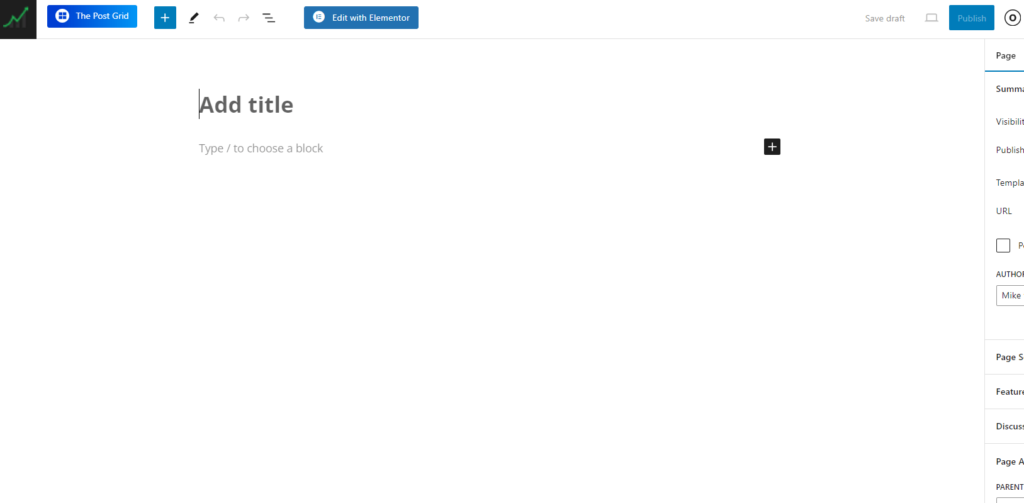
When it comes to creating content on WordPress, you have two main options: pages and posts. Pages are static, timeless content that provide information about your business or organization. On the other hand, posts are timely, blog-style content that keeps your website fresh and up-to-date. To add a page, simply go to your WordPress dashboard, click on “Pages” and then “Add New“. You can then give your page a title, write your content, and hit the publish button.
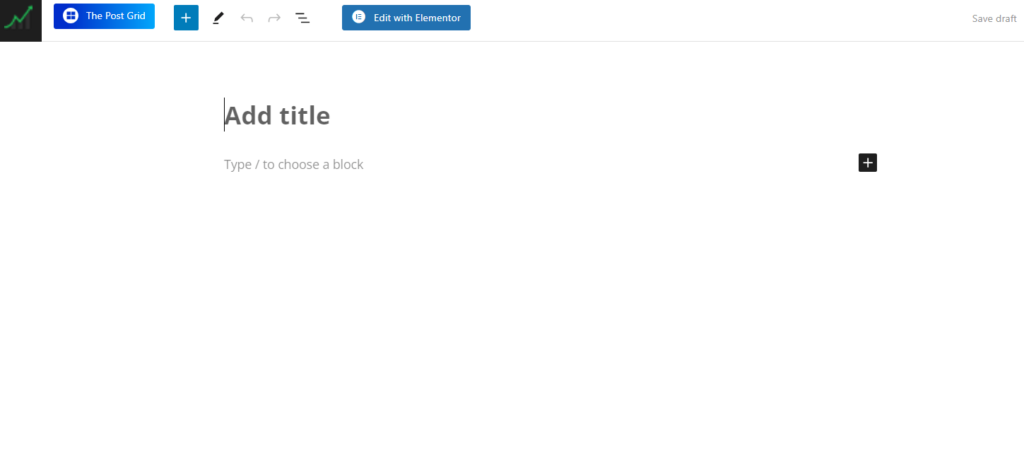
For adding a post, the process is quite similar. From your WordPress dashboard, navigate to “Posts” and select “Add New“. It’s important to note that posts usually have categories and tags to organize and categorize your content, making it easier for your readers to navigate. Just like with pages, you can write your post and publish it for your website visitors to see.
Once you’ve added your content, you may want to enhance it with some multimedia elements. WordPress allows you to easily add images, videos, or other types of media to your pages and posts. To insert an image, for instance, simply click on the “Add Media” button and upload the desired image from your computer. You can then align it, add captions or alt text for SEO purposes, and customize the display settings.
In conclusion, adding content to your WordPress website is a simple yet crucial step in developing an engaging online presence. Whether you choose to create pages or posts, make sure to provide valuable and relevant information to your visitors. And don’t forget to utilize multimedia elements to enhance the visual appeal of your content. By following these beginner’s tips and tricks, you’ll be on your way to creating an impressive and dynamic website with WordPress.
Step 5 : Customizing Blog Settings
Now that you have generated content, for your website it’s time to customize and present it in a way for your users.
Lets begin by configuring a page also known as the homepage.
Configuring a Static Front Page
Head over to the Settings » Reading page, in your WordPress admin dashboard. Within the ‘Front page displays option choose the page and then select the pages you previously created for your home and blog pages.
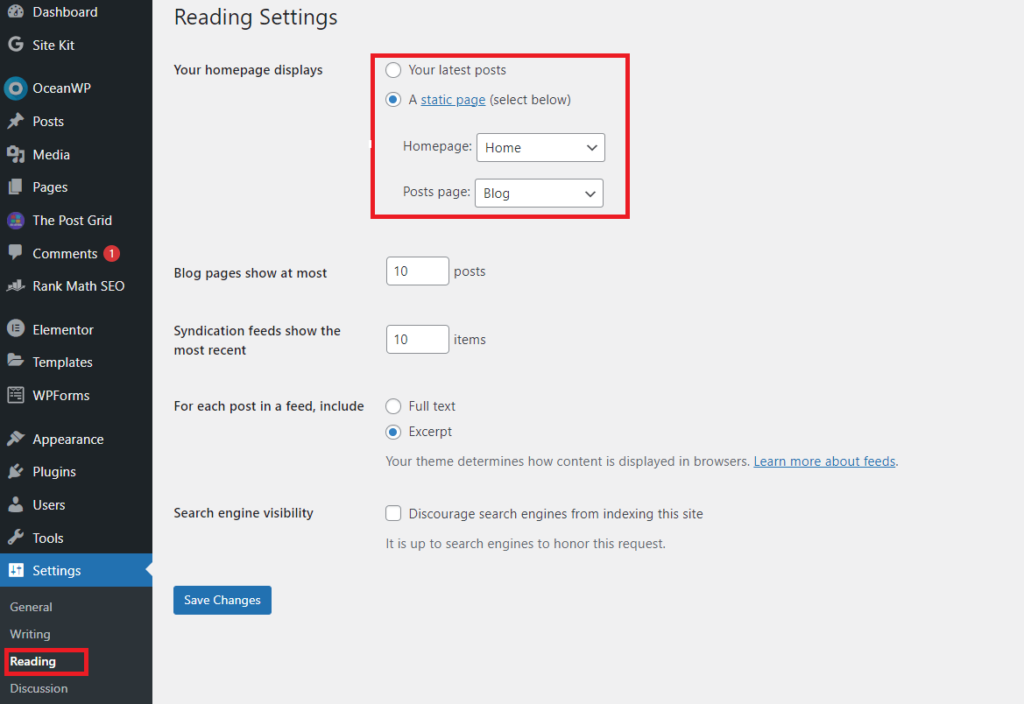
Make sure you remember to click on the Save Changes button located at the bottom of the page in order to save any modifications you’ve made.
WordPress will utilize the page titled ‘Home’ as the page of your website and designate the ‘Blog’ page for displaying your blog posts.
Modify Site Title and Tagline
During the installation process you have the opportunity to select a title, for your website. Additionally you can choose to include a tagline that describes your site.
You have the flexibility to change your sites title and tagline whenever you want by accessing the Settings » General page.
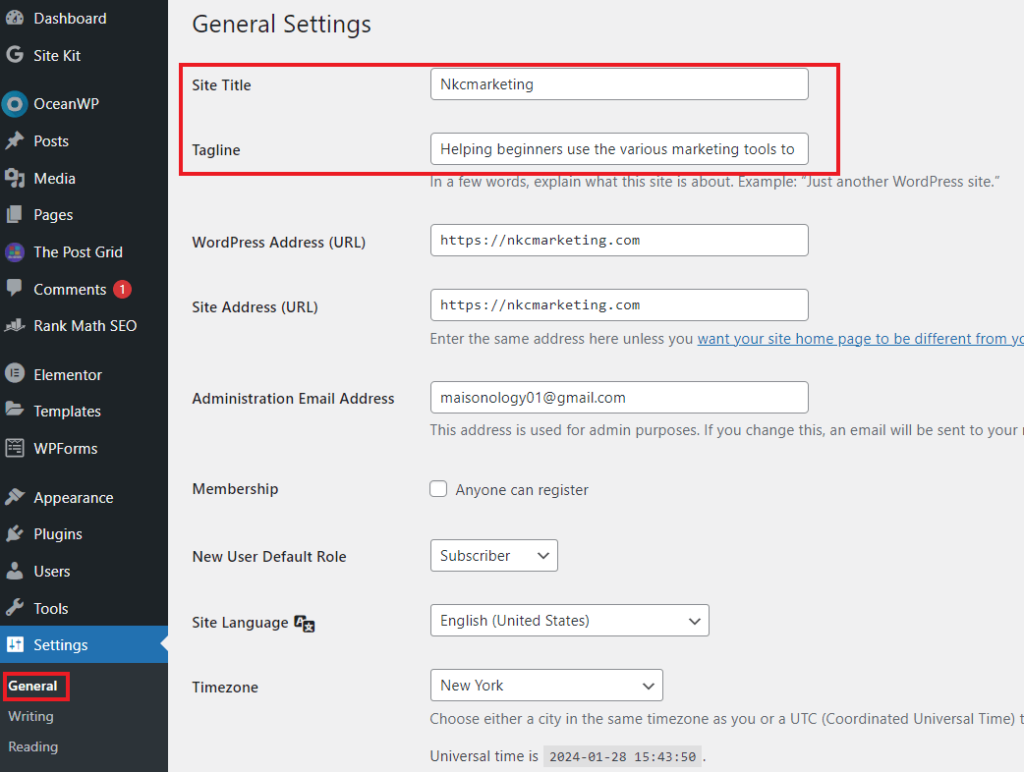
Your site title will be the name of your website, like Nkcmarketing. The tagline is usually a line that describes your website.
Set up Comments Settings
WordPress comes equipped with a comment system that permits users to express their thoughts on your posts. It’s a feature for boosting user engagement on your WordPress site but unfortunately it also attracts spammers.
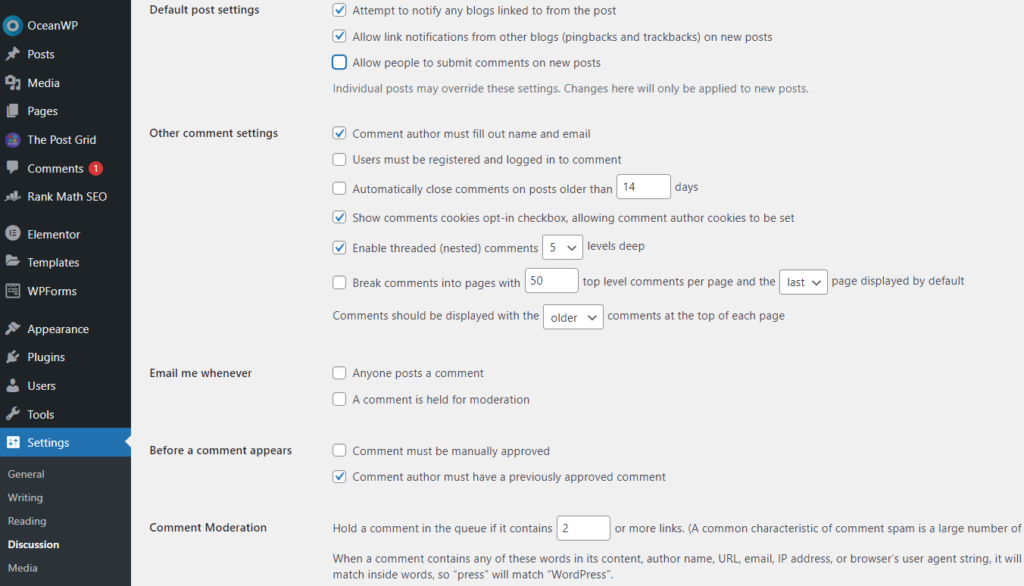
To combat this issue you’ll need to activate comment moderation on your website.
Here’s what you can do, Go to the Settings » Discussions page and scroll down until you reach the ‘Before a comment appears section. Then simply tick the box next, to the option that says ‘Comment must be manually approved’.
Adding Navigation Menus in WordPress
Visit the Appearance » Menus
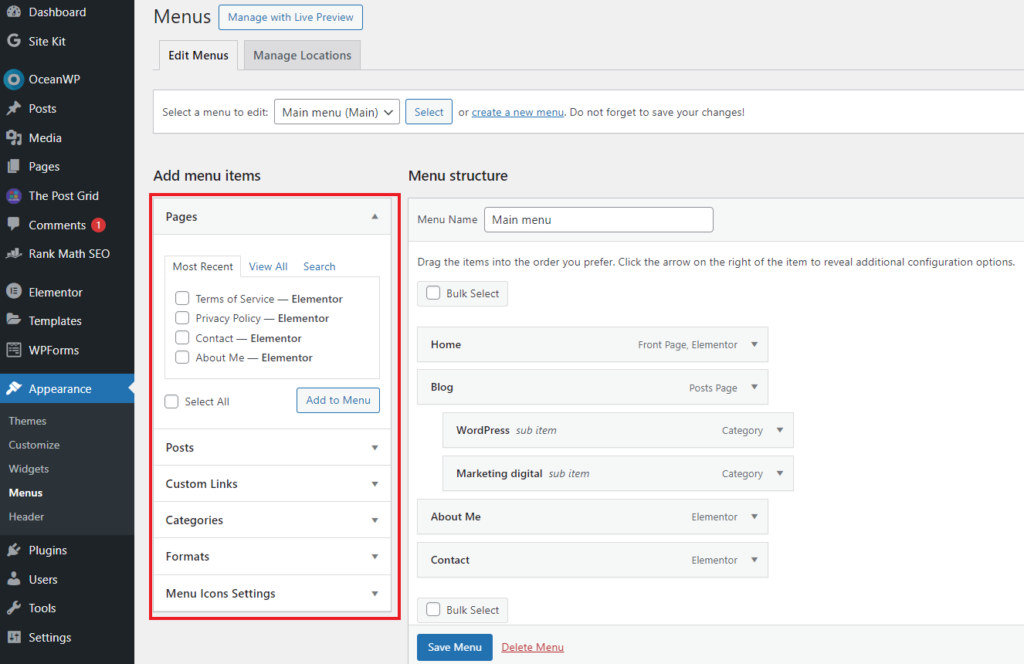
You’ll see that the pages you’ve chosen will fill in the space, on your navigation menu.
You have the ability to rearrange the position of these menu items by moving them up or down.
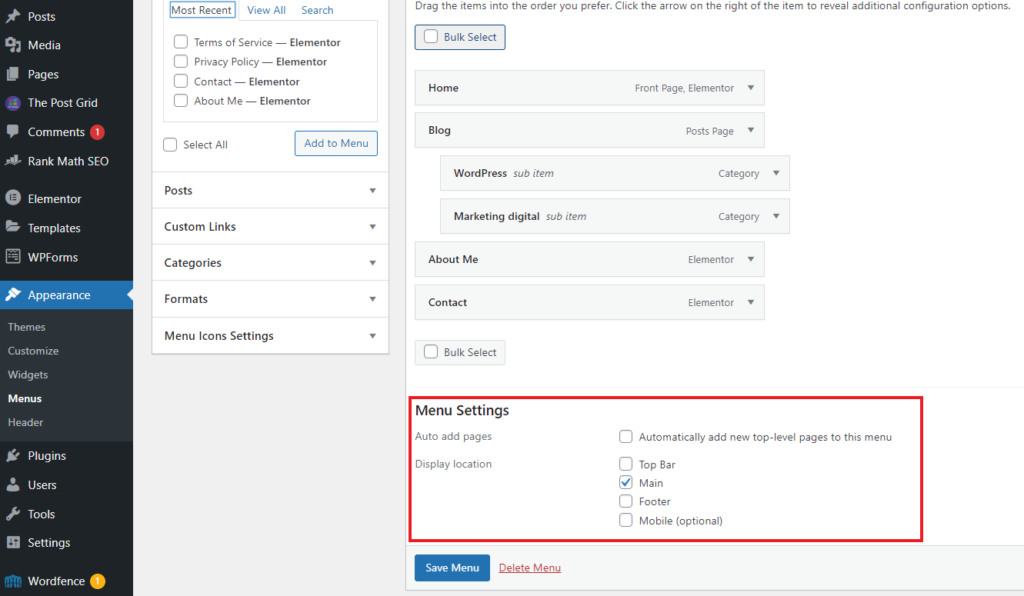
To proceed you will have to choose a display location. These locations are typically defined by your WordPress theme. In cases the primary menu is found at the top of your websites header.
Once you’ve made your selection simply click on the save menu button to store your navigation menu.
Feel free to visit your website and observe the menu, in action.
Step 6 : Essential Plugins Every WordPress Beginner Should Install
WordPress is a popular platform that allows users to create and manage their own websites effortlessly. Whether you’re a beginner or an experienced user, there are certain essential plugins that every WordPress beginner should install. These plugins not only enhance the functionality of your website but also improve its performance and security.
One of the first plugins you should install is an SEO plugin, such as Yoast SEO. This plugin helps optimize your WordPress page or post for search engines, making it easier for your website to be discovered by users. Yoast SEO provides valuable feedback on keyword usage, readability, and meta descriptions, ensuring that your content is search engine-friendly and easily understandable for your audience.
Another important plugin to consider is a caching plugin, like WP Super Cache or W3 Total Cache. These plugins improve your website’s loading speed by storing a static version of your WordPress pages or posts. This means that when a user visits your website, they don’t have to wait for the server to generate the page from scratch, resulting in a faster and more responsive experience.
Lastly, a security plugin, such as Wordfence Security or Sucuri Security, is crucial for protecting your WordPress site from malicious attacks and hackers. These plugins provide features such as firewall protection, malware scanning, and login security, ensuring that your website remains safe and secure.
By installing these essential plugins, you can enhance the functionality, performance, and security of your WordPress website. Whether you’re looking to boost your site’s search engine visibility, improve loading speed, or protect against potential threats, these plugins are a must-have for any WordPress beginner. So go ahead, install them and take your WordPress site to the next level!
